
Two weekends in June –
After bumbling around for a while with different bars, brake levers, stems etc. I was getting fed up with the bother and expense of setting up the brakes and replacing the bar tape every time I make a change. It also dawned on me that I wasn’t able to assess what I was doing because I had no means of sitting on the bike with it held upright, without leaning on a wall or something. In fact it dawned on my that I didn’t know where the hell I was at all, objectively, with the way I was sitting on the bike; I’d never seen myself on a bike looking from the side. TL;DR: do this sooner.
Thanks guys
In my efforts to escape from confused arsing around, I have relied on the free online offerings of two bike-fitting guys and I want to acknowledge them. They are Scott McLean of Kinetic Cycle Coaching, in Scotland, and John Weirath aka Bike Fit Adviser, in Colorado. In the next post I’ll reveal what I think about going to a bike fitter and paying them. Gotta not spoiler everything right at the beginning, eh 😉
Note: I haven’t consulted either of these guys and they’re not responsible for the certainly eccentric and possibly wrong ways I’ve used their information.
A stand of sorts
To solve the sitting-upright-on-the-stationary-bike issue, I needed something analogous to a turbo trainer, to hold the bike by the rear axle. I thought about how I could do this with some bits of stuff I had lying around, and soon had an idea. I just needed a quiet few hours when I could go downstairs and make the thing. The only part that was missing was a board for the base, and I picked up an offcut of kitchen worktop in the hardware shop for 4 quid. Making the thing went fairly straightforwardly. It has its limitations: the bike is held at the rear axle by two steel dropout-like parts coming in from the back. The drive-side one would collide with the rear derailleur, so that has to come off. And then in order to turn the pedals without getting the chain all tangled up, the chain had to come off too. It’s not ideal, but € 4 is a lot less than a turbo trainer, and I don’t know if there even is such a thing as a turbo trainer you can use with solid threaded axles. And it fulfils the basic function of allowing me to sit on the bike without falling over.


And another thing
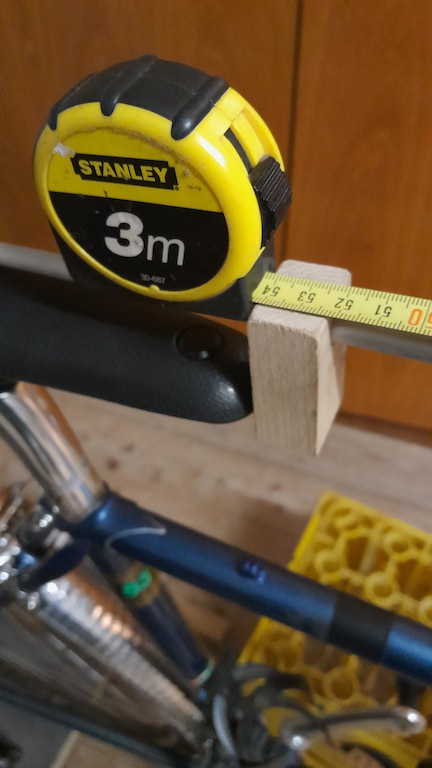
I made another thing from bits that were lying around: a thing to measure the saddle-to-hoods reach. This is tricky because what point on the hoods should we measure? I had a 3.5 cm diameter wooden pole, and I reckon this is roughly the right diameter to simulate my hands resting in the hoods – up against where the curve of the hood stops my hand slipping forwards if I lean on them. I cut about 45 cm of this pole and made a perpendicular hole halfway along and stuffed a length of 8 mm OD aluminium tube into this (fixing it with a screw). Then I made another hole in a little bit of beech wood so that it could slide, fairly stiffly, on the other end of the aluminium tube. The little bit of beech hangs down so I can push it up against the tip of the saddle … and voilà: I can measure the saddle-to-hoods reach. There were two rubbery caps lying around that had been on the canti bosses of the new fork I put on herself’s town bike a few weeks ago, and one of them fits nicely on the end of my aluminium tube; that stops the end of the tube scratching the leather saddle. The final detail was screwing a little bit of stainless onto the wood to make a lip over its centreline, to give me a consistent spot to hook my tape measure to.


All the stuff
And so I decamped to my in-laws’ cellar with the following things:
- the bike
- the stand, and a couple of wooden pads for sitting the front wheel on
- the reach measuring thing
- several different handlebars, stems and brake levers and a few saddles
- a tripod for my phone for taking photos
- a notebook and pen for writing stuff down
- my cycling shorts and shoes
- a beer crate as a step for climbing onto the bike, and for sitting on to think
- and lots of tools, especially a measuring tape and long and short spirit levels, and a small wrench on a string to use as a plumbline
A plan
What I intended to do had two parts:
- Set up the bike fit on New Old Bike (aka the Mercian) as well as I could from beginning to end based on general principles.
- Relate the bike fit to the unsatisfactory situation on Old Bike (aka the Alves), especially as it appeared to me at the end of 2021, which was what prompted me to get a smaller frame.
A preliminary
The Alves was built for me when I was 23 and I’m now more than 30 years older than that, heavier, less fit and less mobile. This we knew. But apart from this, I first looked to see whether there is anything particularly weird about my body proportions. What I already knew is that I am a bit on the little side for a man (169 cm), my arms are always too short for the sleeves of any ready-made jackets and shirts, and my head is large at about 61-62 cm. Attached to the other end of my rather short body are a pair of maybe incongruously long feet that generally take a narrow shoe fitting and have long, straight big toes (my cycling shoes are 45s). Then I noticed this video by John and it seemed like a good idea to check the proportions he talks about here:
As it happens I’m not particularly weird according to these tests. My inside leg (78.5 cm) to height ratio is 46%, so just what John says is average. My hand to hand span is however 167 cm or 2 cm shorter than my height. So despite being a little bit chunky, I’m not a gorilla.
Setting the bike up
I set the bike up in the stand and inserted other bits of wood under the front tyre to equal the height of the back end and get the top tube level. If your bike doesn’t have a horizontal top tube, you’ll have to level the axles (easiest if you have a perfectly flat, level floor – then just equalize the heights of the axles from the floor).
Starting out: cleats
To begin at the beginning, I looked at this video from John:
and then had a look at my cleats.
I marked where the ball of my foot was and the cleats seemed to be slightly behind that, so the fore-and-aft position was ok, I would say. Then I tried to mark the 2nd toe position and check the rotation of the cleats and the one on the right shoe seemed a bit off. This was interesting because I’d felt that something was off with my right foot on recent rides; I thought it was maybe due to the fact that I clip in and out much more often with my left foot than the right one so that the clip/pedal was more broken in in the left side. But I lined the cleat up to my marking and tried it out and now the float felt symmetrical on both sides. Win! Good method. Better than I expected, because I wouldn’t have thought it possible to line up something as small as a 2-bolt cleat precisely enough this way; but the difference was quite visible by eyeing it up carefully with a ruler.
KOPS
Next thing I did was take my improvised plumbline and check my knee position with the crank level and pointing forward (which seems to be conventionally called 3 o’clock). I had been under the general impression that I had lots of saddle setback. Just by sitting in the saddle and looking down, I would have guessed that my knee was 2—3 cm behind the pedal spindle at this point. How wrong can I be! With the caveat that this is really hard to measure precisely – How do you get the string to dangle freely? What part of your knee do you hold it to? – the one thing that was immediately obvious was that by no measure was I behind the KOPS position. Even taking the tibial tuberosity as the reference point I was either exactly at KOPS or even a tiny bit in front of it. I know KOPS doesn’t mean much, but I’d say a decent rule of thumb for an older, overweight, relatively unfit guy like me is that I probably shouldn’t be in front of it. I’m not some kind of time triallist or triathlete. A cm or so behind KOPS couldn’t be described as a weirdly extreme position. So that was the first good result of a bit of objective measurement: my previous assumption that I already had tons of setback was dead.
Saddle setback: first attempt
So I next rammed the saddle as far back as possible. I’ll note at this point that the saddle is my Brooks B17 (which is actually the leather of a Flyer re-homed in DIY mode onto a B17 frame) and the seatpost is a Deda RS 01, which officially has 21 mm of setback. To measure the setback, I marked the spot above the BB on the top tube with a bit of tape. My try square wouldn’t fit on the top tube at this point because it bumps into the brake cable guide; as it happened I’d just bought a pair of cone spanners which came on stout rectangular bits of cardboard, so I used one of those as a right angle and measured from it back to the saddle tip. Moving the saddle as far back as possible gained me about 8 mm. I couldn’t tell the difference this made to my knee position, so I looked for more setback and the option I had was to pop on the Brooks Cambium C15 saddle. The rails on the B17 notoriously mean that it effectively has about 1 cm less maximum setback than many other saddles, including the Cambiums. So on went the C15, which is too hard for my sitbones to ride on, but good enough for stationary fitting purposes. I measured the saddle height vertically from the floor at this point and set the top of the C15 about 5 mm lower than the B17 had been, to compensate for the extra distance from the pedals (the C15 is shallower from the rails to the top than the B17, so this actually involved raising the seatpost a tiny bit). Now the saddle tip was 18 mm further back than the original position of the B17. I checked my knee position again, somewhat inconclusively, but would say it’s definitely also further back than it had been.
Available front end parts
The next thing I wanted to do was achieve an overview of my available options for adjusting the reach at the front end – to put my motley collection of handlebars, stems and brake levers in some kind of relation to each other. It only dawned on me relatively recently that there was a lot of range to be had in reach to the hoods (I’d just been measuring reach to the tops) by choosing longer or shorter reach handlebars and that some of the combinations I’d used in the past were really long. I’ll note here that my shoulder width as measured by Herself is 42 cm.
The handlebars (and their nominal sizes):
- Cinelli Giro d’Italia 40 cm (original handlebar on the Alves, 1990), 26 mm clamp, reach 75 mm (but with ramps angled down quite steeply, as was normal back then)
- Nitto B135 Randonneur bar (bought in 2007 because it sounded cool, with no consideration of the geometry), 42 cm, 25.4 mm clamp, reach 105 mm
- Nitto M176 Dream bar, 42 cm (2020), 26 mm clamp, reach 90 mm
- Zipp Service Course Ergo 70 (2023), 42 cm, 31.8 mm clamp, reach 70 mm, flattened cross section on the tops,
- Specialized Short Reach (2023, bought new for this fitting effort), 38 cm, 31.8 mm clamp, reach 65 mm
(As noted in the previous post, all of the 40/42 cm bars are a bit wider at the hood position than their nominal widths)
The stems:
(The bike has a 1″ threaded steerer)
- Nitto Technomic Deluxe, 6 cm, 26 mm clamp
- Ahead quill adapter post with Ritchey Comp 4-Axis stems, one 7 cm, one 8 cm, both ±6°.
The brake levers:
- 1980s non-aero Campy Nuovo Record (original levers on the Alves)
- Shimano BL-R400
- Dia Compe Evo
- Cane Creek SCR-5C
- TRP RRL
Obviously this collection of stuff offers far too many combinations to measure them all, so I started by having a look at a couple of relatively extreme configurations. And at this point I also wanted to reconstruct the reach that I’d had on the Alves at certain points in the past. I knew that the tip of saddle > tops reach on the Alves had been 46 cm before I’d started messing with it in 2021.
The long
I started with the 6 cm Nitto stem + the B153 bars + the Cane Creek SCR-5C levers. This was a combination I used on the Alves in about 2017–2018. The reach from saddle tip to hoods was 584 mm and from saddle tip to tops, 446 mm. Correcting that to the 460 cm of the Alves means the saddle > hoods reach back then must have been 598 mm. The B135 is a really deep handlebar.


What was uncomfortable in the past
Next, I looked at the 6 cm Nitto stem + the M176 bars + the Dia Compe Evo levers. This was what I had on the Alves in late 2020 and 2021. Saddle to hoods: 571 mm; on the Alves it must have been 585 mm. If I go back to the position on the Alves at the end of 2021, which was good for sitting up but gave me the saddle sores, the saddle setback would have been pretty much the same. At that time I had the B17 all the way back in the Deda RS01 seatpost, and the Alves has a 73° seat tube vs. the 74° of the Mercian, meaning the Alves frame itself gives about 1 cm more setback.
And the short
Ok, so then I wanted to see what potential I had for shortening the reach. So I switched over to the Specialized Short Reach handlebar with the Shimano BL-R400 levers. They have the shortest hoods that I can still more or less hook the ball of my hand onto. The old Campy levers would be a little bit shorter still, but at the price that they are so small I can really only hook my thumb over them; the base of my thumb/heel of my hand would always be on the ramp of the handlebar. To put on this handlebar, I had to switch over to the quill/Ahead adapter, and to keep things as short as possible, I fitted the 7 cm Ritchey stem in the 6° ‘up’ position. This resulted in a reach to the tops of 455 mm, 1 cm more than the 6 cm Nitto. But even including this, the reach to the hoods was only 514 mm. So there’s my range of adjustment: 584 – 514, or 70 mm. Plenty to play with.
Ski-jumping zombies
At this point I started getting up on the bike and doing the two tests described by Scott as the mummy/zombie and the ski jumper.
I’ll spare you the sight of what me doing this looks like from the side. It ain’t pretty and if somebody shoved me down a ski jump I think I’d be setting the record for the shortest ever distance. Straight down off the edge. But it’s very instructive for me to see myself like this. Anyway: generally speaking in the mummy/zombie test, using the short setup just described, my hands were landing well in front of the hoods, suggesting I could cope with a bit more length, but the position from which I could comfortably sit up also seemed to be a bit above where the bars/hoods were.
A similar kind of test is described by John here and here, but done while pedalling on a trainer. That makes a lot of sense to me because it gets closer to testing what happens when you’re actually riding the bike. In my version I’m just sitting there with my legs statically braced against the pedals, either with the cranks level or with one leg stretched out. This is obviously a much cruder method but I was hopeful it’d get me more or less right.
Long hoods
Anyway, as far as I could tell, a couple of cm more reach than this minimum was going to be ok. In particular, it would be ok to install the TRP RRL levers, which have the longest hoods of all. There are several reasons why I prefer these to the others; here are the ergonomic ones:
- The hoods are so long that essentially my whole hand can fit on them without relying on the bit of handlebar behind the hood. Ramps plus hoods are essentially 3 hand positions.
- I prefer the ergonomic flared-to-the-outside lever shape
- I like the scooped-out shape of the top part of the lever, which gives me a really nice forward grip position, and also the part just below the fulcrum which makes it easy to brake lightly from the hoods without stretching my fingers further down.
- The levers come with wedges that I can insert or leave out to adjust their angle to the handlebar.
A break
I popped on the RRLs and they seemed ok. I also played with the 8 cm stem. Then I checked my wrist position. According to John here,
the bones leading to my middle finger should be more or less in a straight line with my forearm. I looked at this in images from my phone, set up on a tripod at a suitable position, and realized my hand was actually turned the opposite way to what John demonstrates there. I needed to angle the hoods down more, if anything. This could be done by putting the wedges into the RRL levers, but I’d left them at home. So that’s where I stopped until the next weekend.
In between
In the meantime I made a note to bring the wedges for the RRL brake levers, and also tried to work out a rideable solution for the setback, given that the C15 saddle and my bum are not friends.
Either I could find a saddle that goes further back in the clamp, or I could look for a seatpost with more setback. For reference, it seems that the Selle Anatomica and the Brooks Swallow or Swift are the leather candidates that could go 1 cm further back. Possibly my sitting position would a little bit further back on a Berthoud Aspin, but the straight section of the rails isn’t any closer to the tip. I could of course switch to a plastic saddle like a Terry Arteria or another Cambium – maybe a “carved” C17 would be kinder than the C15. But then I found the Velo Orange Grand Cru Long Setback seatpost, with 30 mm setback compared to the 21 mm of the Deda, and found that velosaloon.com of Vienna had it in stock. As that would allow me to deal with just the setback, it seemed like a better bet; a new saddle could be an expensive way of introducing new complications. So I ordered the VO seatpost and had it by the next weekend.
Weekend 2: finishing up
So, the next weekend I continued with the steps of the bike fit I’d stopped short of:
- I swapped out the Deda RS01 seatpost and put in the new Velo Orange Grand Cru one with the 30 mm setback, but with the B17 saddle. Landing me in pretty much the same saddle position as I’d been testing with the C15.
- And I put the wedges in the RRL levers and set up the rotation of the handlebar carefully so as to have my wrist position good on the ramps (such as they are; they are tiny on the Specialized Short Reach bar).
Finally, I set the handlebar height, with the 7 cm stem turned upwards, to a point that I could easily sit up from. This turned out to be with the top of the handlebar 2.5 cm above the middle of the saddle.
Then I finished the bike up mechanically – installing new brake cables, etc., and it was ready to try out.
Parallel to the bike fitting I’d been working on a couple of other things.
- When taking off the rear wheel I noticed the wheel bearing was rough. Seemed like I had wrecked the new bearings by overtightening them. Comes from not having a full set of cone wrenches. These hubs take 13s for the – not cones, because there are cartridge bearings, but preload nuts – and 17s for the locknuts. So I acquired a pair of 13 mm cone wrenches and set the thing up better. But in the course of that I noticed the axle rotation still felt rough. Must replace the bearings again soon.
- I replaced the SunTour XCD6000 derailleurs (original ones from the Alves) with a pair of 1988 Deore XT I picked up in nearly-new condition a few weeks ago.
- Completely cleaned and degreased the drive train and switched over to Squirt wax chain lube.
Outside
With that it was time to take the bike outside. The in-laws’ house is in a place where a ride around the block of 4 or 5 km has quite a mix of up and down hills, including some really steep bits, and flat, which makes a handy test ride. First laps with the stem in the ‘up’ position showed that my hands now had much less weight and the bike handles much better. Presumably because one ideally steers a bike with one’s rear end and my arse is now in a happy position relative to the pedals. However, that position is very relaxed. I then flipped the stem over, which makes the bars about 1 cm lower and 1 cm further out. That also seemed fairly cosy. A slight stretch, but probably fine once I get warmed up; at the time, I hadn’t been riding for the last month. Good enough for the moment. So I took the bike back in and wrapped on the new bar tape. Still cheap bar tape, for the moment …
First decent ride was then from the in-laws’ to home, with young ’un. About 37 km on a lovely summer evening, taking the most scenic route along the river. Nice 🙂 Bike is now fine, no hand pain, nice handling. Next tweak is already done, which is flipping the stem back up, reducing the reach, but at the same time lowering the handlebar to about 1.5 cm above the saddle. I’ll see how that goes on a ride or two. But I’m pretty confident the fit is now inside the good zone for me, aka the right ballpark.


This way to the final episode of the New Old Bike story >>
Leave a Reply
You must be logged in to post a comment.